

An incorrectly adjusted rear derailleur can cause mis-shifts, grinding gears changes, chain skips, and can lead to premature wear of the your drivetrain. Before attempting to adjust the rear derailleur it is necessary that you check a few things first.
Is the chain clean and lubed? If your chain is 6 months old there is a good chance that it may be worn. Overtime chains can stretch. This will cause the teeth of your rear cassette not to mesh correctly with the front chainrings, wearing out the drivetrain. Check every link by bending the chain back and forth at the link.
Are the chainrings or cassette worn out? Conduct a visual inspection of the rear cassette and front chainrings. If either has excessive wear you should replace both the cassette, chainrings, and chain.
Is the Derailleur Bent? Check that the rear derailleur hangs straight and vertical below the sprockets. If it is not straight it is recommended that you take the bike to a shop in your area to have it repaired.
Are the cables in good condition? Clean cables are essential to good shifting. If the gear cables are excessively dirty or have rust on them they should be replaced. Cleaning and lubricate the cables and the housing. Check the cable housing. If it is cracked, dirty, or bent. Replace cables and housing.
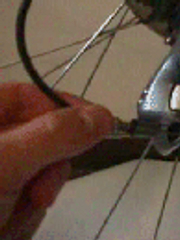
Use a 5mm Allen wrench and loosen the bolt holding the cable on the rear derailleur. Thread the shift cable through the cable stays and tighten it in the rear derailleur with as little slack as possible. Make sure that the adjustment screw on the shifter is in the midpoint of the adjustment.
Shift the chain into the big chainring and the smallest cog. As you turn the cranks to pedal the bike, make sure that the chain rides silently on the small cog. If it does not and tries to skip up to the next biggest cog, unscrew the high (marked H) setting screw on the back of the derailleur. If the chain is trying to skip out beyond the small cog, tighten the screw slightly.
Perform adjustments in 1/4 turn increments. Next, shift the chain into the small chainring and biggest cog. Perform the same check on the cog. Loosen the low (marked L) screw to move the chain to the inside and tight to move towards the outside. After the screws are set, shift to the middle chainring and the smallest cog. Check to see if the shifters will shift the chain into the next highest cog when shifted once.
If the chain does not shift, unscrew the cable adjustment screw on the back of the derailleur until the cable jumps up onto the next cog. Try shifting back and forth between these two gears. If the cable does not want to shift up quickly enough, increase cable tension by unscrewing the cable adjustment screw. If it does not want to shift down to the smallest cog, decrease cable tension by screwing the cable screw in.
Repeat this step for the next couple of gears until all are shifting correctly. If you are having trouble getting the shifting right, it could be a number of problems: Dirty or dry cables - see Cable Lubing Dirty Derailleur - clean and lube thoroughly Bent Derailleur Hanger - Look to see if it is bent. Bad cable - Replace it! New chain/Old gear cassette or vice versa.